Wednesday, March 31, 2010

Living Easter Decorations

My childhood Easters were full of plastic eggs full of jellybeans and Peeps, stuffed bunnies and a new Easter outfit.  Although I still do baskets full of treats for my kids, I have tried to make our decorations less plastic and expensive by using things I already have around the house and adding a fresh spring twist.  I wanted to share a few of the Easter decorations I put together this year.

I made a couple living Easter baskets this year.  Yes, that's real grass growing in that basket!  It couldn't be easier to make too.  First, choose a basket.  If you want to have this on a table inside, be sure to line with plastic to prevent drips.  Fill your basket with potting soil and sprinkle on grass seed.  I bought a small bag of grass seed that is used to fill in spots on the lawn, about $3.  Cover your seed with about 1/4" of soil and spritz with a water bottle.  You want to keep the soil moist.  You should see grass coming up within 3 days.  The basket above is about 5 days of growth.  I even had to give it a haircut.  I made the banner by printing out computer-generated text on copy paper and then distressing with Tim Holtz distressing ink.  The banner is secured by three skewers.  I plan to add some little chocolate eggs to the grass for easter and use this as our centerpiece.


Here's one of the favor boxes I made for my guests for Sunday.  I started out with an unfinished box from Michael's ($2.99).  I painted the box with acrylic paint I had lying around the house and used a crackle glaze to age it.  I added wooden beads, also from Michael's (.99 for 12).  I created a small tag using an SU punch and added the bunny from Tender Toile stamp set.  Now, wait til you see what I did to the back of the box...

I printed out a vintage image, distressed and adhered it to the inset of the box using white glue (couldn't find my Mod Podge), then I sealed the surface.  I have a whole bunch of vintage images saved for projects.  You can too.  Just subscribe to the "The Graphics Fairy" blog and receive free vintage clip art every single day.  She also has free backgrounds for you bloggers out there.  Click on "The Graphics Fairy" button on my sidebar to sign up.

On with the decorations... I had this decorated basket sitting on top of my china cabinet in the kitchen and I had carrots growing in pots on my deck, so I thought why not combine the two for Easter?  I repotted some baby carrots into smaller pots that would fit nice into the basket.  You could add moss too, but I like it just the way it is.

Now, lets go see the outside decorations...

Here's a planter I created for beside the front door to welcome my guests.  I found this gorgeous camellia that was just fanning out that way and just couldn't resist.  I added a couple Creeping Fig and a bunny statue that was hiding out in the garden.  What's nice about this is I can relegate the planter to another part of the yard when Easter is over.  I have a particularly ugly cinder block wall I would like to cover, and the Creeping Fig will do just that in no time.


Okay, you're probably saying "What in the world did Wendy do with her poor garden boots?".  Well, yes, they were my boots, but after wearing them just one time, I almost broke my ankle trying to get them off.  They were just too cute to give away, so I poked some drainage holes in the bottom, added some pebbles, and put some perky little flowers in the top.  They make me smile every time I see them.


I leave you with a quick little card I made using another vintage clip art image from "The Graphics Fairy".  This print reminded me of French carrots, so I printed out a computer-generated title and sentiment, added a cuttlebugged BG and some brads.  This will be going off to my high school best friend. We met in French class many moons ago, so I thought she would love this.  By the way, she aced that class, while I barely made it through. 

It may be a little early to wish everyone a Happy Easter, but I do hope you all have a wonderful Easter weekend full of special moments and people you love.  Oh, and a few Peeps just to make life interesting.

Til next time,

Sunday, March 28, 2010

Sushi Grass


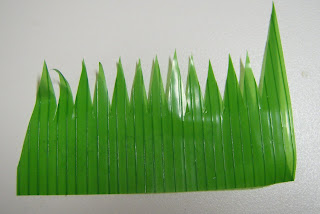
What do you do when a friend shares a great idea with you?  Well, if you're a blogger, you post it to share with all your blogging friends!  My crafting friends and I get together once a month and EAT craft together.  This time, it was at my friend Ali's house and boy did she have a great idea to share with us.  She shared a story of watching a co-worker sit down with a lunch of sushi, as she discarded the decorative green plastic strip that surrounded the container, inspiration struck.  Ali said, "can I have that?", to the bewilderment of her co-worker, and the following is what my genious friend Ali did with that strip of plastic:

She made grass!!!!!


And here's how she did it:

She turned the strip upside down on a piece of cardstock (I used some temporary adhesive on mine, so that it would not move while I worked).  Then, she used green ink and a sponge, working from top to bottom, stroke the sponge downward.  In my example, I then used a different shade of green and moved my template slightly to create a shadow effect.  Ali also pointed out that you could make a "forest" effect with this technique as well.

And here's the card I created using this technique:

I used an SU set called Simply Spring (ret), SU markers and spritzed the stamp with water before stamping on watercolor paper.  The bird and bee are also from this set, stamped in StazOn brown, colored with markers and popped up on the card.  I added a stamped SU sentiment, rounding the corners with a punch.  The borders are made with an MS punch on DCWV Spring Pack textured CS.  I punched out some tulips, once in pink and then in white for the corners.  The BG is more DCWV textured CS that I ran through the Cuttlebug with a swirl envelope.  I then sanded the embossed panel.  I had these darling little bunny brads that I added to the corners of the card to finish it off.

Thanks Ali for sharing this fun technique.  I can't wait to experiment more with it.  I'm thinking maybe as a border treatment next.

Have a great Sunday everyone!

Til Next time,

Saturday, March 27, 2010

Saturday Inspiration Challenge

Okay, I was done for once I saw the beautiful images at Thymes .  Of course, this is for the inspiration challenge over at Splitcoast today.  The images of Thyme's bath collections are just so beautiful.  I chose the one below because it reminded me of the brayer technique, and I have been trying to practice when I can.  I took Michelle Zindorf's beginner and advanced brayer class last fall, and I'm still working on my technique.
So here is what I created:

I used the SU set called Fabulous Flowers and a flourish set from Autumn Leaves Clear Stamps.  The flowers were stamped in Bravo and Baroque Burgundy and heat embossed.  I then stamped the flourishes in Creamy Caramel and embossed.  Next came the brayer, and this is where I had a little difficulty; you see, I realized I didn't have a large burgundy stamp pad (eegads!).  I used my stampin spots to coat the brayer, not "fabulous", but in a pinch it worked....and on we go.  I stamped the sentiment in Bravo Burgundy and added some rhinestones to some of the flowers.  The mat is punched with an SU corner punch, and that, as they say, is it!

If you ever get the opportunity to take one of Michelle's classes, I highly recommend it.  Even if you don't brayer all the time, she has so many great tips for stamping and creating scenes.  See her blog link on my sidebar. 

I'm busy, busy with upcoming projects and will be posting all this week.  Stay tuned.

Til next time,

Friday, March 19, 2010

Sometimes Things Are Black And White

Hi there,

I love black and white cards, but they are sometimes a challenge.  I have found that using texture is always a good rule of thumb in using the black/white combination.  Here, I'll show you what I mean:


I created this card using a retired SU set, called Tender Toile.  It just seemed so dainty and feminine, that I wanted to surround the image with lacy texture.  I used several punches and my Cuttlebug to give the card dimension, and you all know how much I like adding dimension!

To start with, I stamped my image with black Pigment ink.  Pigment ink stays wet longer than dye ink, and therefore can be embossed. 


Here's a quick tip for embossing without a tray:  I take a piece of scratch printer paper and fold in half.  I then pour my embossing powder on my image over this folded paper, then just fold the paper edges together and pour the excess powder back in the jar; simple, but it works great.


After heat embossing my image, I used two different sizes of square Nestabilities to cut my image and a mat for the image.  Adhered with pop-dots.


Now, it's a matter of adding punched pieces as if they were pieces of moulding on a picture frame.  We are going to use several punches and dry embossing to do this.


First, I used a MS border punch and cut strips that matched my mat.  Don't worry about the corners here; we will be covering those up. 


Next, I used an SU corner punch, forgive me for not remembering the name and I'm too lazy/tired/old to get up and look.  I trimmed the edges, as shown and added the punched shapes to the corners of my stamped image panel.


To cover the corners on our border strips, we are going to use a butterfly punch from Anna Griffin.  I actually punched 8 butterflies, four of which I cut in half, removing most of the body, leaving just the wings with a little extra (sounds gruesome, I know... the horror of papercrafting!). 

I first placed the complete butterfly, one in each corner, and then used fast-drying glue to attach the second set of wings, so they appear to be in flight.


Now, you could certainly add more layers of punched borders and details, but for the sake of this post not becoming a novel, I moved on to my background.  I embossed a 5-1/4 x 4-inch piece of cardstock using my Cuttlebug and Victoria folder.  Before I adhered my embossed panel to my card base, I adhered a length of satin ribbon to it. 

Now, let's see that finished card again...


For the finishing touch, I stamped my envelope to match, added a satin bow with a glue dot to the attached ribbon, and lastly,stamped the inside of my card.


Well, that's it for me tonight.  The weather is just unbelievably wonderful this week, so you can find me in the garden tomorrow.

Til next time,

Thursday, March 18, 2010

Some Crafty Organization

I've been redesigning my craft area a little to give myself a little bit more room to create and less clutter to deal with.  I don't know about you, but when things are messy, I just can't create anything. 

I purchased a couple of storage units that I'm really excited about and can't wait to share with you.

I purchased these storage cubbies from Target.  They are made by Closet Maid and were about $30 each.  I now have all my unmounted stamps in CD cases and organized in alphabetical order.  I'm so thrilled with this set-up.  It's so much easier to find a stamp set now that they are out of CD boxes.  Here's a closer look at the cases.


The other organizational unit I purchased was from Michael's and it was a bit pricey ($99), but with a 40% off coupon, I was able to bring the price down to within reason.


The unit has three fabric drawers, which can be labeled, and my favorite part, the top of the unit is open to store all the much needed supplies that usually sit on my desk.  I also re-purposed the ribbon rod on the side to hold my roll of paper towels.  This sits right next to where I work and has really cleared out my working space.  It's also on wheels, so can easily be moved to wherever I am.

Well, because I've gained all this space by organizing, I was able to easily create a card this morning.  The stamps I used were from a retired SU set called Garden Collage.  I stamped the butterfly several times and watercolored.  I then cut them out and coated with Crystal Effects.  The sentiment is from Anna Griffin.


I also used a Martha Stewart border punch, as well as an SU label punch.

It feels so good to have everything in my little crafting space neat and tidy and I hope to keep it that way.

Til next time,

Sunday, March 14, 2010

Give your stamped images dimension, a pictorial

I get so much satisfaction from taking a one-dimensional image and making it "jump off the page" with layers.  The following are the tricks and techniques I've picked up along the way to really add life to my stamped images. 

I started off by printing my image three times.  Here, I'm using a sweet digi stamp from Phindy's Place.  If you look at the image, you have three levels of depth (4 if you count the bird on the umbrella).  Remember, you can click on the picture to enlarge it.

1.  The puddles on the ground.
2.  The main character.
3.  The umbrella.

If you look at your stamped images this way, you will see how they need to build upon one another. 


The first level here has been cut with my nestabilities and includes the entire image.  This will be my base level that I will build all the other levels upon.  Using Prisma pencils and baby oil, I colored in the puddles at the base of the hedge hog's (is it a hedge hog?) feet.  I also outlined the entire image in blue pencil and blended with baby oil.  This line will give definition to the image, like a shadow.  You don't have to use blue for this shadow, yellow, purple and grey work well too.


From second image, I cut out the main character with scissors, as well as the umbrella.  For really tight places, you can use a craft knife.  The important thing is to make sure you don't cut past the black line.  I used my pencils to just edge the image, no need to blend, with color.

My final image, which will be the one you see on the finished product is colored completely and blended.  I then sealed my coloring with a matte sealer and let dry thoroughly.  I then cut the little hedgie separately from the umbrella. 


I use a black marker to go around all the cut edges.  You wouldn't believe what a difference this makes to the definition of your finished card.


Now, the umbrella as you can see, is convex in this photo.  To get this appearance, I use an embossing tool and a foam pad.  I turn my image over and use my embossing tool to press into the segments of the umbrella, as if coloring them.  This will give a rounded appearance to the image.  I do this with any image that would appear round in actuality. 


Now the fun part, putting all your images together!


I add pop-dots to the back of my second image.  You can also use glue dots for less dimension, or just adhere the image without any space between.  Okay, now add your cut image to your base level image.


You now have a two-dimensional image, which is great, but we can do better.


We are going to add our third and final layer to our base image.  Again, if you wanted to, you could do a fourth level by cutting out the bird on the umbrella and popping him up too.


Add your pop-dots to the third level pieces and adhere on top of the second level.  You can see I keep my dots towards the center of the image, but still supporting all parts of the image.  You will see how this is important next.


You now have a three-dimensional image.  I use a dot of glue to secure the areas that I don't want to appear floating in air, such as the tips of the umbrella, the hedgies feet, etc.  I used some Crystal Effects on the puddles and some gel pen to highligh my image.  You could also add Crystal Effects to the umbrella to make it look wet.


And here's the finished card.  I added a punched border, ribbon, a button, computer-generated sentiment and a couple acrylic drops.  Oh, I also added some dots with a gel pen around my circle. 

Note:  In adding the acrylic dots, I had a little trouble with my fast-drying glue.  Lesson learned, when the glue does not come out easily, don't squeeze harder  Thank goodness I sealed my image!

Well, I hope you all enjoyed this pictorial and will try this techinique on your own.  Now for the blog candy winner. 

The winner is Barbara Diane!

Barbara e-mail me your address at craftyfoody@gmail.com so I can get your stamps and a few other goodies out to you.

Til Next time,


Powered By Blogger